Export
Description
The final step in the DecalMaster workflow is exporting. This involves assigning decal atlases and combining decal geometry to increase rendering peformance,
then channel packing the trim sheets and atlases textures maps, finally transfering the texture files
and optionally a geometry FBX file into a structured folder for import into game engines like Unity, Unreal Engine, Godot, etc.
This process is streamlined through the use of the export tool.
To access the tool, go to DecalMaster > Export located on the Maya menu bar.
Atlases Assignment
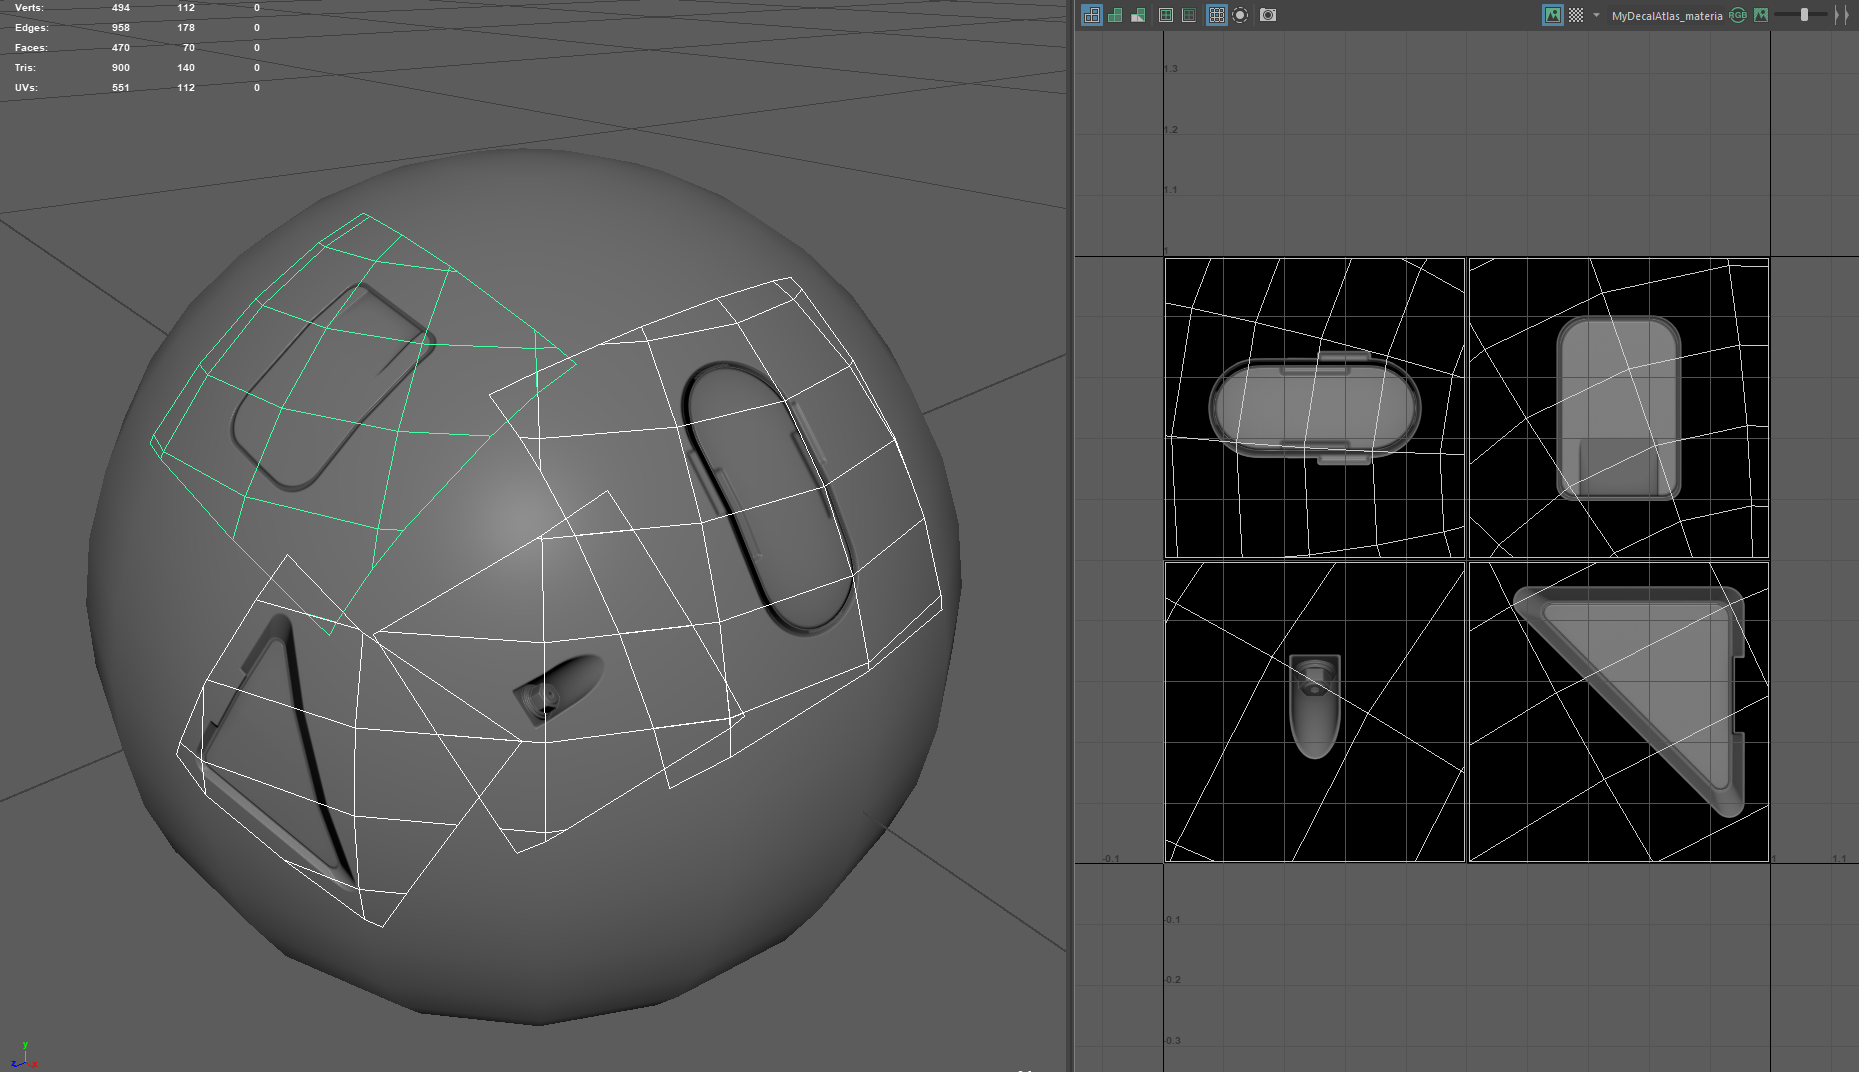
In DecalMaster using an Atlas means, changing a Decal's UVs to match the position of that Decal in the Atlas.
Individual Decals have UVs covering the entire UV space, but atlased Decals only cover a small part of it.
With the UVs changed, all Decals belonging to the same Atlas, will then also share a single Atlas Material.
The Decal Atlases page provides more information on the purpose of assigning decals to atlases.
This process can be undone, so you can restore your original decals using unique textures at any time.
Combining & Separating Decals
For similar reasons as assigning all individual decals into a single atlas texture, all decal shapes can be combined into a single shape. Each decal shape is essentially a GPU primitive and each primitive goes through an assembly stage. The GPU primitive assembly stage is costly regardless of the primitives triangle count, so reducing all decal primitives into a single primitive, by combining the shapes, means the assembly stage needs only to be called once which can significantly increase GPU performance if many decals are used.
This process can also be undone, so you can restore the original decal shapes to make changes at any time.
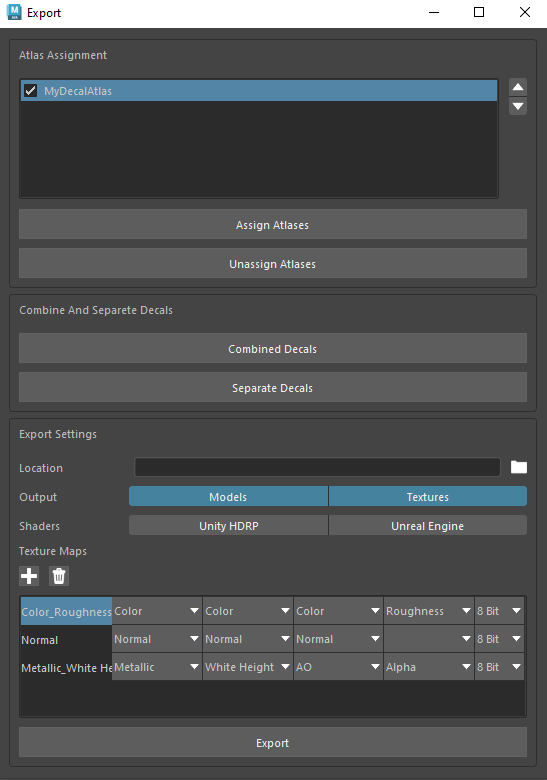
Export Settings
-
Location
Sets the desired export folder location.
-
Output
Determines the output files
-
Models
Exports fbx file containing 3D models in scene.
-
Textures
Exports trim sheets and decal atlases texture maps employed in scene.
-
Models
-
Shaders
Copies default shader graphs or material node trees for popular game engines into the export folder to streamline the process of recreating materials.
-
Texture Maps
Exports trim sheets and decal atlases texture maps employed in scene.
 Add an additional png file for export.
 Removes the selected png file from export.
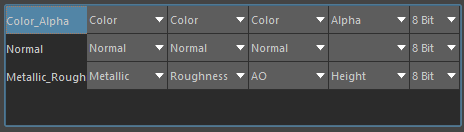
The texture map channel packing table enables you to select each texture map to export per png file channel, red, green, blue, alpha. As well as the ability to control the bit-depth.
The available texture maps for channel packing are determined by the texture maps present in the assigned atlases.
Exporting to Unity
HDRP
Importing into Unity is fairly straight forward but there are some important requirements of the HDRP pipeline to follow which will be laid out here.
Also to streamline the process DecalMaster provides default shaders graphs for decals and trims which require little more than plugging in the correct texture maps or material properties.
Export Texture Maps Configuration:
Unity parallax occlusion mapping only allows height maps to embed but not emboss, meaning the height maps white color is zero displacement rather than gray, for this reason the White Height Map must be used.
Aside from the White Height Map, the default texture map channel packing is already configured to align with the default decal and trim Unity shaders provided by DecalMaster.
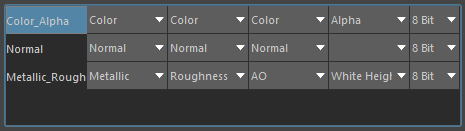 An example of the default texture map channel packing. The texture channel packing and shaders can be customized to your pipeline.
FBX configuration:
Once the fbx and texture files have been imported into your Unity HDRP project you'll need to extract the materials the model uses into a location within your project.
Click on the fbx file in the asset browser and select the materials tab in the inspector. Click on the Extract Materials and select or create a materials folder to extract the materials used by the fbx.
- Decal submeshes must have cast shadows disabled to avoid artifacts.
Materials Setup:
Shader selection is important when building materials to ensure the decals & trims will blend seamlessly with the target mesh. Unity provides a shader that closely resembles the materials used in Maya, ArnoldStandardSurface for the base materials and DecalMaster provides shaders for the decals & trims.
- The target mesh materials must use Unitys ArnoldStandardSurface shader to precisely match the material properties of the corresponding Maya materials.
- The decal atlases materials should use the Decal_Shader. The materials surface type must be set to transparent and preserve specular lighting must be disabled.
- The trim materials should use the Trim_Shader. The materials surface type must be set to opaque.
- The material properties such as base color, specular weight, specular roughness, and metallic will need to be manually copied over from their corresponding Maya materials.
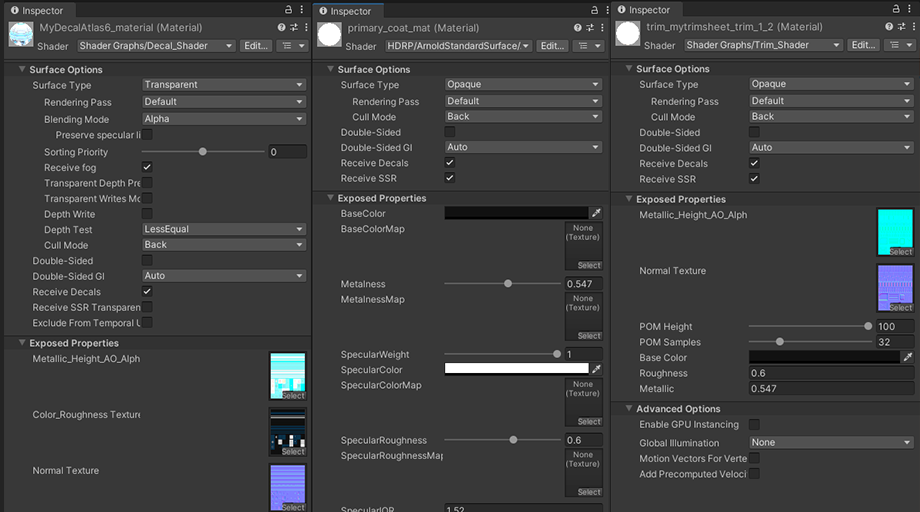 A side by side example of the materials inspector settings for the three types of materials used. Left to right: Decal_Shader, ArnoldStandardSurface, Trim_Shader.
URP
Coming Soon.
Exporting to Unreal Engine
DecalMaster provides default decal & trim material node trees that include parallax occlusion mapping and only require plugging in the correct texture maps or material properties.
Unreal Engines default masked surface shader has all the properties needed to correctly blend material-packed decal atlases with the base mesh materials, however,
for material-unpacked decal atlases Unreal Engines deferred decal shader lacks multi-opacity blending.
Instructions for modifying the source code to enable opacity blending individual material properties like base color, roughness, metallic, and normals through are provided below.
Packed Decal Atlases
Export Texture Maps Configuration:
The default texture map channel packing is already configured to align with the default decal and trim Unreal Engine material node trees provided by DecalMaster.
Unreal Engine parallax occlusion mapping node allows height maps to embed and emboss using the reference plane parameter, meaning the height maps grey color is zero displacement, for this reason the default Height Map should be used.
 An example of the default packed decal atlas texture map channel packing. The texture channel packing and shaders can be customized to your pipeline.
FBX configuration:
- Decal submeshes must have cast shadows disabled to avoid artifacts.
Materials & Textures Setup:
- Decal Materials should use the Packed_Decal_Shader.
- The material must use the masked surface type with the masked blend mode.
- Alpha mask should be connected to the opacity mask channel for correct blending with the target mesh.
- The trim materials should use the Trim_Shader. The materials surface type must be set to opaque.
-
Texture maps exported from DecalMaster are in linear space and so when imported into Unreal Engine they must be set to linear color space mode, this is done by unchecking the sRGB toggle in the texture properties.
The Normals Texture Map should be in normal mode, all other texture maps should be in linear color mode.
Unpacked Decal Atlases
To correctlly utilize Unreal Engines deferred decal system you'll need to use unpacked decal atlases. Integration largely works out of the box but if you incorporate subset materials in any of your decals then you'll need to modify the engine to correctly blend with them. The process of modifying the engine is described below this section.
Export Texture Maps Configuration:
In the case of decal atlases that include subset materials, along with the default texture maps, the subset mask must be exported as well.
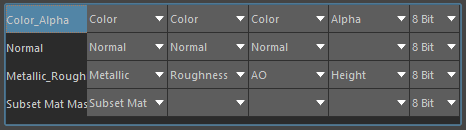 An example of the default unpacked decal atlas texture map channel packing. The texture channel packing and shaders can be customized to your pipeline.
FBX configuration:
- Decal submeshes must have cast shadows disabled to avoid artifacts.
Materials & Textures Setup:
- Decal Materials should use the Unpacked_Decal_Shader.
- The material must use the deferred decal type with the translucent blend mode.
- An append3 node must be used to combine the alpha mask and subet mask. The alpha mask must be connected to the normal(Y) component and the subset mask must be connected to the color(X) and roughness/metallic(Z) components of the append3 node, the append3 node must be connected to the opacity channel for correct blending with the target mesh.
- The trim materials should use the Trim_Shader. The materials surface type must be set to opaque.
-
Texture maps exported from DecalMaster are in linear space and so when imported into Unreal Engine they must be set to linear color space mode, this is done by unchecking the sRGB toggle in the texture properties.
The Normals Texture Map should be in normal mode, all other texture maps should be in linear color mode.
Enabling Multi-Opacity Blending in Unreal Engine
Unreal Engines deferred decal shader pipeline does great when blending between a base material and an overlayed decal material using the opacity property of the decal material. Although, there is one drawback, the opacity property is only a global float
value that blends all decal material properties with the base material.
But what if we want to blend individual decal material properties, for example we want one opacity value to blend only the decals normal onto the base material and another opacity to blend the decals color/roughness/metallic onto the base material.
This image of the inset screw below demonstrates the desired functionality.
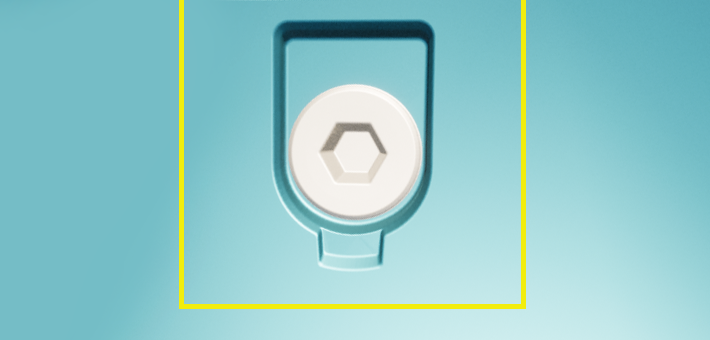 Multi-opacity allows the decals material (metal) to daw its normal map onto the base material (blue) outside of screw while the decals color, roughness, and metallic opacities are confined to drawing only the screw.
Without multi-opacity, we're unable to utilize subset materials on decals like the one in the image above. You could either choose to ignore subset materials on your decals or implement the behavior into Unreal Engine.
Luckily, this behavior can be implemented with only a handful of changes to Unreal Engines source code. This is so easy because Unreal Engines existing renderer largely implements multi-opacity but strangely doesn't allow the user to pass a float3 value to the opacity property of materials.
The following section will outline the steps required to enable the behavior.
It should be noted that this changes nothing about single channel opacity for all existing materials.
Building Unreal Engine from Source:
The first and by far the most time consuming step in this process will be to build Unreal Engine from source. If you've already built Unreal Engine from source then it will only take a few minutes to make the modifications. Otherwise, following Unreal Engines step by step instructional page will make the process straight forward.
Source Code Modifiations:
Once you are able to build from source, entering the code changes is trivial. The only thing that needs to be done is converting the material opacity input from a single float value to a float3 value.
There are a total of five files that require only a few lines of code modified. The code changes will be highlighted to simplify identification.
Initially the compiler code will need to modified to convert the material interface value from a MCT_Float to a MCT_Float3.
UnrealEngine-5.2/Engine/Source/Runtime/Engine/Private/Materials/MaterialAttributeDefinitionMap.cpp
257
Add(FGuid(0xB8F50FBA, 0x2A754EC1, 0x9EF672CF, 0xEB27BF51), TEXT("Opacity"), MP_Opacity, MCT_Float3
, FVector4(1,1,1,0), SF_Pixel);Now, nodes that have three components like rgb or xyz can be connected to the materials opacity input.
Shader Code Modifiations:
Afterwards the Unreal shader header that retrieves the material opacity will need to be altered to utilize the float3 value.
There are two lines of code will need to be altered in this file. The return type must be converted from a half to a half3.
UnrealEngine-5.2/Engine/Shaders/Private/MaterialTemplate.ush
2833
half3
GetMaterialOpacityRaw(FPixelMaterialInputs PixelMaterialInputs);
...
2855
half3
GetMaterialOpacity(FPixelMaterialInputs PixelMaterialInputs);
Next we'll need to make changes to the deferred decal and mesh decal shaders files to utilize the multi-opacity values.
UnrealEngine-5.2/Engine/Source/Runtime/Engine/Private/Materials/DeferredDecal.usf
171
const float3
Opacity = Coverage;
172
#else // STRATA_ENABLED
173
float3 Color = GetMaterialEmissive(PixelMaterialInputs);
174
175
// deffered decal multi-opacity (red channel is color, green channel is normal, blue channel is roughnes/metallic/specular )
176
float3
Opacity = GetMaterialOpacity(PixelMaterialInputs) * DecalFading;
177
178
FGBufferData GBufferData;
179
GBufferData.WorldNormal = MaterialParameters.WorldNormal;
180
GBufferData.BaseColor = GetMaterialBaseColor(PixelMaterialInputs);
181
GBufferData.Metallic = GetMaterialMetallic(PixelMaterialInputs);
182
GBufferData.Specular = GetMaterialSpecular(PixelMaterialInputs);
183
GBufferData.Roughness = GetMaterialRoughness(PixelMaterialInputs);
184
GBufferData.CustomData = 0;
185
GBufferData.IndirectIrradiance = 0;
186
GBufferData.PrecomputedShadowFactors = 1;
187
GBufferData.GBufferAO = GetMaterialAmbientOcclusion(PixelMaterialInputs);
188
GBufferData.ShadingModelID = SHADINGMODELID_DEFAULT_LIT;
189
GBufferData.SelectiveOutputMask = 0;
190
GBufferData.PerObjectGBufferData = 1;
191
GBufferData.DiffuseIndirectSampleOcclusion = 0;
192
GBufferData.Velocity = 0;
193
194
DecalCommonOutput(In, Out, Color, Opacity, GBufferData);
195
#endif // STRATA_ENABLED
196
197
#if NUM_VIRTUALTEXTURE_SAMPLES
198
FinalizeVirtualTextureFeedback(
199
MaterialParameters.VirtualTextureFeedback,
200
MaterialParameters.SvPosition,
201
Opacity.x
,
202
View.FrameNumber,
203
View.VTFeedbackBuffer
204
);
205
#endifUnrealEngine-5.2/Engine/Source/Runtime/Engine/Private/Materials/MeshDecals.usf
158
const float3
Opacity = Coverage;
159
#else // STRATA_ENABLED
160
float3 Color = GetMaterialEmissive(PixelMaterialInputs);
161
162
// deffered decal multi-opacity (red channel is color, green channel is normal, blue channel is roughnes/metallic/specular )
163
float3
Opacity = GetMaterialOpacity(PixelMaterialInputs);
164
165
FGBufferData GBufferData = (FGBufferData)0;
166
GBufferData.WorldNormal = MaterialParameters.WorldNormal;
167
GBufferData.BaseColor = GetMaterialBaseColor(PixelMaterialInputs);
168
GBufferData.Metallic = GetMaterialMetallic(PixelMaterialInputs);
169
GBufferData.Specular = GetMaterialSpecular(PixelMaterialInputs);
170
GBufferData.Roughness = GetMaterialRoughness(PixelMaterialInputs);
171
GBufferData.CustomData = 0;
172
GBufferData.IndirectIrradiance = 0;
173
GBufferData.PrecomputedShadowFactors = 1;
174
GBufferData.GBufferAO = GetMaterialAmbientOcclusion(PixelMaterialInputs);
175
GBufferData.ShadingModelID = SHADINGMODELID_DEFAULT_LIT;
176
GBufferData.SelectiveOutputMask = 0;
177
GBufferData.PerObjectGBufferData = 1;
178
GBufferData.DiffuseIndirectSampleOcclusion = 0;
179
GBufferData.Velocity = 0;
180
181
DecalCommonOutput(In, Out, Color, Opacity, GBufferData);
182
#endif // STRATA_ENABLED
183
184
#if NUM_VIRTUALTEXTURE_SAMPLES
185
FinalizeVirtualTextureFeedback(
186
MaterialParameters.VirtualTextureFeedback,
187
MaterialParameters.SvPosition,
188
Opacity.x
,
189
View.FrameNumber,
190
View.VTFeedbackBuffer
191
);
192
#endif
The changes to note here are that the Opacity parameter has been converted to a float3 data type and where the param is supplied to the FinalizeVirtualTextureFeedback function the x component of the value is used.
This way opacity behaves the same when only a single channel alpha is passed to the material.
It should also be noted that DecalCommonOutput function does take the full Opacity value, that function will now need to be modified to take in a float3 value parameter.
The DecalCommonOutput function will take in the multi-opacity value and output it into the D-Buffer. Unreals D-Buffer already accepts a multi-opacity input so this will be the final modification that is needed.
UnrealEngine-5.2/Engine/Source/Runtime/Engine/Private/Materials/DecalCommon.ush
77
void DecalCommonOutput(inout FPixelShaderIn In, inout FPixelShaderOut Out, float3 Color, float3
Opacity, FGBufferData Data)
78
{
79
#if DECAL_RENDERSTAGE == DECAL_RENDERSTAGE_MOBILE
80
// Cheap mobile forward approximation uses both emissive and color.
81
Color += Data.BaseColor;
82
#if MATERIALBLENDING_MODULATE
83
Color *= Opacity.x
;
84
#endif
85
#elif DECAL_RENDERSTAGE == DECAL_RENDERSTAGE_AO
86
// Replace color with AO for AO decals.
87
Color = lerp(1, Data.GBufferAO, Opacity.x
);
88
#endif
89
90
#if DECAL_RENDERTARGETMODE == DECAL_RENDERTARGETMODE_SCENECOLOR || DECAL_RENDERTARGET == DECAL_RENDERTARGETMODE_GBUFFER || DECAL_RENDERTARGET == DECAL_RENDERTARGETMODE_GBUFFER_NONORMAL
91
Color *= View.PreExposure;
92
#endif
93
94
Out.MRT[0] = float4(Color, Opacity.x
);
95
96
#if DECAL_RENDERTARGETMODE == DECAL_RENDERTARGETMODE_DBUFFER
97
{
98
float3 MultiOpacity = Opacity;
99
100
EncodeDBufferData(Data, MultiOpacity, Out.MRT[0], Out.MRT[1], Out.MRT[2]);
101
102
#if DECAL_RENDERTARGET_COUNT == 4
103
Out.MRT[3] = 1.0f; // DBufferMask
104
#endif
105
}
106
#endif
107
108
// This is not support by Strata
109
#if DECAL_RENDERTARGETMODE == DECAL_RENDERTARGETMODE_GBUFFER || DECAL_RENDERTARGETMODE == DECAL_RENDERTARGETMODE_GBUFFER_NONORMAL
110
111
// Dummy outputs from EncodeGBuffer()
112
float4 OutTarget1 = 0;
113
float4 OutTarget4 = 0;
114
float4 OutTarget5 = 0;
115
float4 OutTarget6 = 0;
116
117
#if DECAL_RENDERTARGETMODE == DECAL_RENDERTARGETMODE_GBUFFER
118
{
119
EncodeGBuffer(Data, Out.MRT[1], Out.MRT[2], Out.MRT[3], OutTarget4, OutTarget5, OutTarget6);
120
}
121
#elif DECAL_RENDERTARGETMODE == DECAL_RENDERTARGETMODE_GBUFFER_NONORMAL
122
{
123
EncodeGBuffer(Data, OutTarget1, Out.MRT[1], Out.MRT[2], OutTarget4, OutTarget5, OutTarget6);
124
}
125
#endif // DECAL_RENDERTARGETMODE
126
127
#if MATERIALBLENDING_MODULATE
128
// BaseColor MRT location changes for render target mode.
129
#if DECAL_RENDERTARGETMODE == DECAL_RENDERTARGETMODE_GBUFFER
130
Out.MRT[3].rgb *= Opacity.x
;
131
#elif DECAL_RENDERTARGETMODE == DECAL_RENDERTARGETMODE_GBUFFER_NONORMAL
132
Out.MRT[2].rgb *= Opacity.x
;
133
#endif
134
#endif // MATERIALBLENDING_MODULATE
135
136
Out.MRT[1].a = Opacity.x
;
137
Out.MRT[2].a = Opacity.x
;
138
Out.MRT[3].a = Opacity.x
;
The EncodeDBufferData function takes in the MultiOpacity variable and outputs the components to the D-Buffer. The X component controls the decals color, the Y component controls the decals normals, and the Z component controls the decals roughness/metallic opacities.
Now when supplying the decals alpha mask, it can be passed to the normal component, then the subset mask can be supplied to the color and roughness/metallic components of the decals opacity to achieve the subset material blending.
 Vector3 node combining the alpha mask and subset mask to achieve subset material blending.
And that's all that code modifications that need to be done! If you have any questions or problems, feel free to join the discord community to discuss them.