Trim Sheets
Description
Trim Sheets are synonymous with Decal Atlases, they pack multiple small textures into a single larger texture, these small textures can be non-repeating, horizontally repeating or verically repeating.
Trim Sheets and Decal Atlases serve two purposes, one is to combine many textures into a single large texture to reduce texture sampler usage in the gpu shader pipeline which improves rendering performance in game engines like Unity, Unreal Engine, Godot, etc.
The other purpose is to achieve high texel density on a mesh without needing a very large texture map to cover the entire mesh by utilizing small repeating textures across many faces, thus saving disk space and vram usage.
Trim Sheets, like any texture, can be used to display material properties like color, roughness, metalness but also the illusion of additional surface detail through normal mapping or the more advanced parallax occlusion mapping.
Although Trim Sheets & Decal Atlases are identical, their functionality in DecalMaster differs by how they are applied. Trim Sheets are specifically applied directly to the target mesh uvs through trims, while Decal Atlases are generated from the Decal & Flow geometries projected onto the target mesh.
Placement
To place a trim on a target mesh:
- Select any number of faces on the target mesh where you want the trim to be placed.
- Selecting edges between the selected faces manually directs uv seams of repeating trims with a closed selection loop.
The Radial Menu default hotkey is
SHIFT + SPACE.
You can select both faces and edges using Mayas multi component select tool.
 Important Note
Trim unwrap currently does not support triangle or n-gon faces well. It is highly recommended to temporarily quadrangulate your selection, by adding or removing edges, to achieve best results.
Trims placed onto a target mesh that has a Maya StandardSurface or aiStandardSurface material applied to the selected faces will automatically match its material.
Trims faces are uv unwrapped differently for repeating and non-repeating trims.
Repeating trims uvs are set to Outside fit mode to allow the trim rect to repeat across the faces, maintaining the original trim rect ratio.
Non-repeating trims uvs are set to Stretch fit mode to ensure the faces get a full coverage of the trim rect, ignoring the original trim rect ratio.
Adjustment
After inserting a trim the DecalMaster Adjust Tool will be enabled in trim mode.
You can also access the DecalMaster Adjust Tool from the Radial Menu by clicking the Adjust button or pressing its hotkey A while the Radial Menu is open.
To select a trim for adjustment, with the DecalMaster Adjust Tool active, enter face component selection mode on the target mesh and select any face unwrapped to a trim to begin adjusting.
The DecalMaster Adjust Tool behaves differently depending on your selection, in trim mode you are given the manipulators to:
-
Cycle Trim
Hold
SHIFTthen mouse scroll wheel or press1or2.Cycle through the available trims in the library the original trim was located.
-
Cycle Fit Mode
Hold
CTRLthen mouse scroll wheel or press1or2.Cycle through the trim fit modes.
-
Translate
Default hotkey
W.Translate the trim in uv space.
-
Rotate
Default hotkey
E.Rotate the trim in uv space.
-
Scale
Default hotkey
R.Scale the trim in uv space.
You can exit the DecalMaster Adjust Tool at any time by pressing
Q or Esc.
Trim Sheet Editor
The Trim Sheet Editor is used to create and edit DecalMaster trim libraries that are displayed in the Radial Menu.
To access the tool, go to DecalMaster > Create > Trim Sheet Editor located on the Maya menu bar.
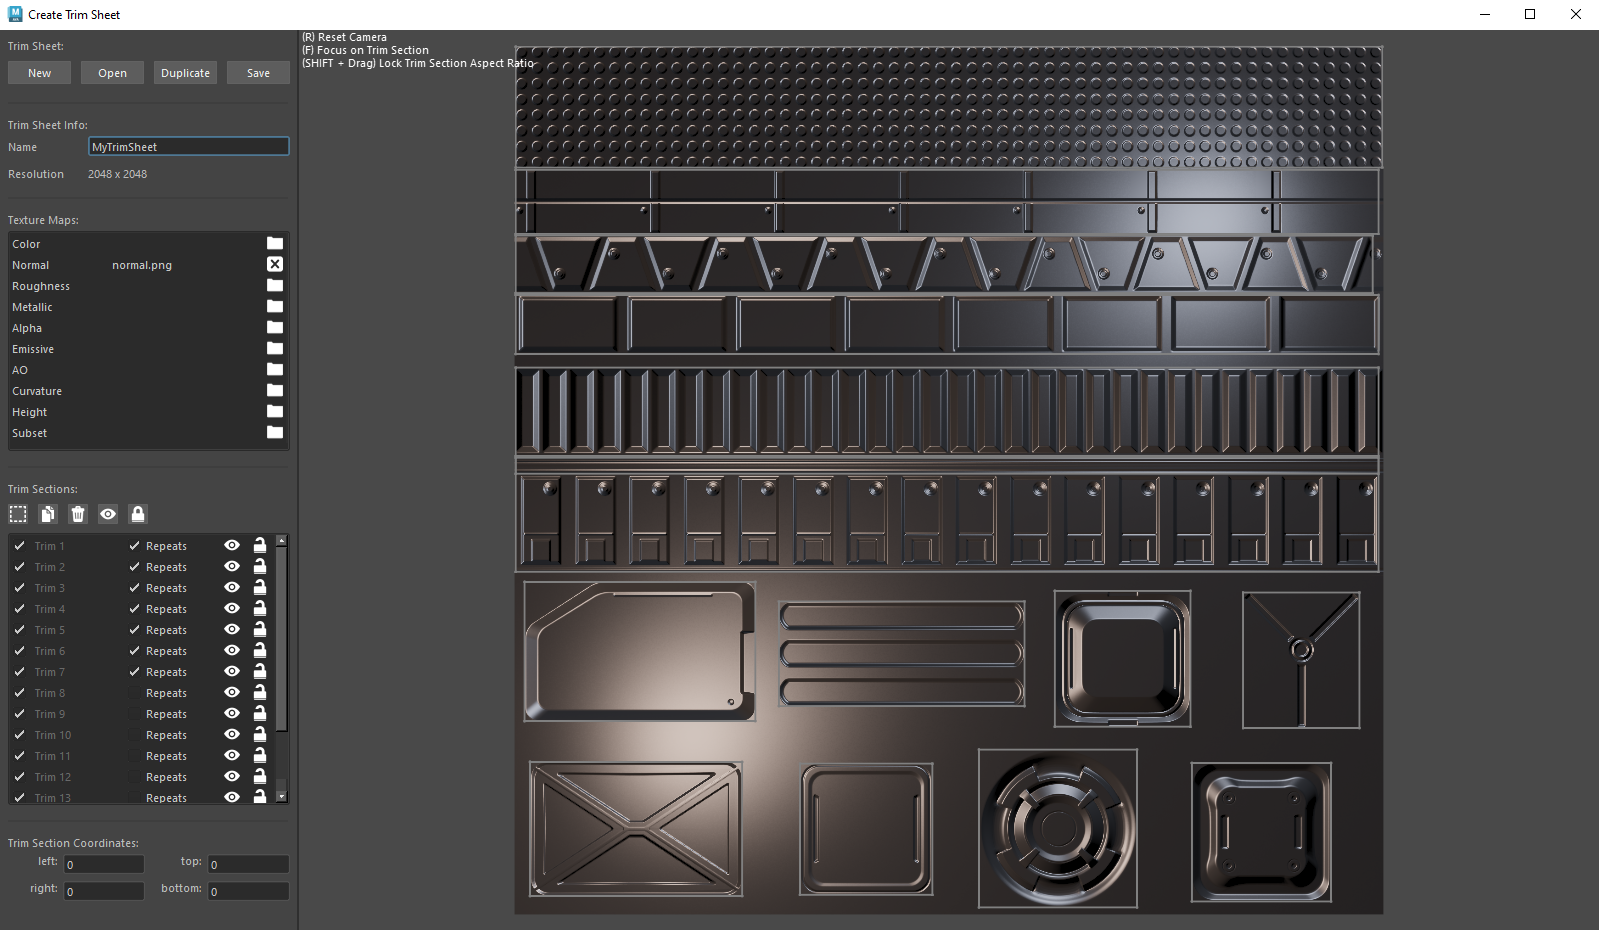
Creating a Trim Library
To create a new trim library, you must provide texture maps from a baked trim sheet.
The only required texture maps are either a Color texture map or a Normal texture map, all other texture maps are optional.
The resolution of the texture maps must all be equal and will determine the resolution of the trim sheet.
Trim Tools
 Create a new trim rect. Initially the trim rect will cover then entire trim sheet.
 Duplicate the selected trim rect. Duplicating can be quicker than making a new trim rect in cases where trims have simliar dimensions.
 Completely removes a trim from the trim sheet.
 Toggles the active state of a trim. Inactive trims are hidden to the trim library but still remain on the trim sheet.
 Toggles the selection lock of a trim. To avoid accidently selecting trims and in case trim rects overlap it can be useful to lock a trim from mouse selection.
Trim sections can be scaled by either mouse dragging the sides of the rect or through the trim section coordinates inputs. Coordinates inputs can be used to precisely scale a trim if pixel perfect dimensions are required.